
Use context: kubectl config use-context k8s-c1-H
You're asked to confirm that kube-proxy is running correctly on all nodes. For this perform the following in Namespace project-hamster :
Create a new Pod named p2-pod with two containers, one of image nginx:1.21.3-alpine and one of image busybox:1.31 . Make sure the busybox container keeps running for some time.
Create a new Service named p2-service which exposes that Pod internally in the cluster on port 3000->80.
Find the kube-proxy container on all nodes cluster1-controlplane1 , cluster1-node1 and cluster1-node2 and make sure that it's using iptables. Use command crictl for this.
Write the iptables rules of all nodes belonging the created Service p2-service into file /opt/course/p2/iptables.txt .
Finally delete the Service and confirm that the iptables rules are gone from all nodes.
译文:
你被要求确认kube-proxy在所有节点上都正确运行。为此,在名称空间 project-hamster 中执行以下操作。
创建一个名为 p2-pod 的新Pod,有两个容器,一个是 nginx:1.21.3-alpine 的镜像,一个是 busybox:1.31*** 的镜像。确保busybox容器持续运行一段时间。
创建一个名为 p2-service 的新服务,在集群中通过3000->80端口向内部公开该Pod。
在所有节点 cluster1-controlplane1 、cluster1-node1 和 cluster1-node2 上找到kube-proxy容器,并确保它正在使用iptables。为此使用 crictl 命令。
把属于已创建的服务 p2-service 的所有节点的iptables规则写进文件 /opt/course/p2/iptables.txt 。
最后删除该服务,并确认所有节点的iptables规则已经消失。
解答:
kubectl config use-context k8s-c1-H创建一个pod
k run p2-pod --image=nginx:1.21.3-alpine $do > p2.yaml

vim p2.yaml
p2.yaml
# p2.yaml
apiVersion: v1
kind: Pod
metadata:
  creationTimestamp: null
  labels:
    run: p2-pod
  name: p2-pod
  namespace: project-hamster             # add
spec:
  containers:
  - image: nginx:1.21.3-alpine
    name: p2-pod
  - image: busybox:1.31                  # add
    name: c2                             # add
    command: ["sh", "-c", "sleep 1d"]    # add
    resources: {}
  dnsPolicy: ClusterFirst
  restartPolicy: Always
status: {}
创建pod
k -f p2.yaml create创建一个服务
k -n project-hamster expose pod p2-pod --name p2-service --port 3000 --target-port 80服务的yaml文件类似如下
apiVersion: v1
kind: Service
metadata:
  creationTimestamp: "2020-04-30T20:58:14Z"
  labels:
    run: p2-pod
  managedFields:
...
    operation: Update
    time: "2020-04-30T20:58:14Z"
  name: p2-service
  namespace: project-hamster
  resourceVersion: "11071"
  selfLink: /api/v1/namespaces/project-hamster/services/p2-service
  uid: 2a1c0842-7fb6-4e94-8cdb-1602a3b1e7d2
spec:
  clusterIP: 10.97.45.18
  ports:
  - port: 3000
    protocol: TCP
    targetPort: 80
  selector:
    run: p2-pod
  sessionAffinity: None
  type: ClusterIP
status:
  loadBalancer: {}
检查svc,pod,ep
k -n project-hamster get pod,svc,ep确认kube-proxy 正在运行且使用iptables
ssh cluster1-controlplane1
root@cluster1-controlplane1$ crictl ps | grep kube-proxy
root@cluster1-controlplane1~# crictl logs 27b6a18c0f89c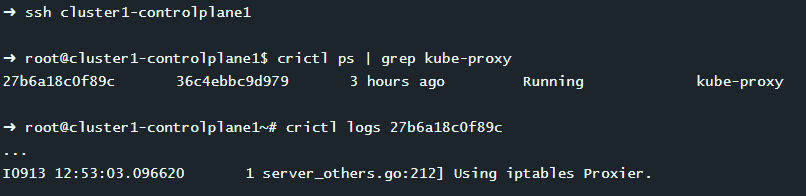
检查kube-proxy 创建了iptables规则
ssh cluster1-controlplane1 iptables-save | grep p2-service
ssh cluster1-node1 iptables-save | grep p2-service
ssh cluster1-node2 iptables-save | grep p2-service
写日志到文件
ssh cluster1-controlplane1 iptables-save | grep p2-service >> /opt/course/p2/iptables.txt
ssh cluster1-node1 iptables-save | grep p2-service >> /opt/course/p2/iptables.txt
ssh cluster1-node2 iptables-save | grep p2-service >> /opt/course/p2/iptables.txt
删除服务后检查iptables规则
k -n project-hamster delete svc p2-servicessh cluster1-controlplane1 iptables-save | grep p2-service
ssh cluster1-node1 iptables-save | grep p2-service
ssh cluster1-node2 iptables-save | grep p2-service